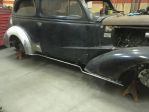
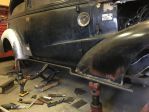
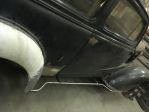
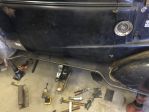
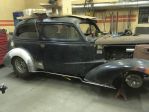
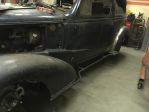
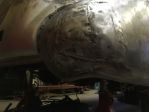
Members Login
Username 
 
Password 
    Remember Me  
Post Info TOPIC: 1938 Chev


http://lightspeedmetaldesign.com/

Status: Offline
Posts: 307
Date:
1938 Chev
Permalink  


Most of you will know this build already, if not search the OR site. I'm not going to start the build thread all over again.

Got the trans cross member in. I like it.

IMG_1740.JPG

Yep, CNC plasma cutters are so handy.


Attachments
__________________


Clarington Ont

Status: Offline
Posts: 164
Date:
Permalink  
 

Looks sweeeet Mike, nice work!

__________________

Whitey


http://lightspeedmetaldesign.com/

Status: Offline
Posts: 307
Date:
Permalink  


Engine, trans and rear diff in place measured up for a drive shaft. Guy on KIJIJI says he has a GM one exactly right length. Come home with it only to find out it's a Dodge.no

Now I have to make a GM yoke fit a Dodge shaft to a Ford rear diff. Measured every thing up, looked up the specs on dennysdriveshaft website, found the joints I needed. Down to my favorite autoparts store. $45 later I got 2 joints and driveshaft in place. No pictures of this as it's mostly dodge parts, didn't figure any one would want to see them.wink

Starting making a new floor pan. Laid out a framework of 3/4" square tube, flat bar rolled for over the trans tunnel. Throw a sheet of 18 gauge on the CNC plasma table cut out some pieces. Slip rolled, bead rolled and bent in all the right spots and temporarily held in place with sheet metal screws.

IMG_1757.JPGIMG_1759.JPG

IMG_1752.JPG


Attachments
__________________


Vineland On Rod-Side Member

Status: Offline
Posts: 421
Date:
Permalink  
 

Looks great Mike !

__________________


Niagara Falls Rod-Side Member

Status: Offline
Posts: 174
Date:
Permalink  
 

good looking floor and braces................does that trans crossmember have enough ground clearance, if you had a flat tire? Looks a bit low, but i am guessing how high the car may sit.............

thanks for bringing us along on the build.............

__________________


http://lightspeedmetaldesign.com/

Status: Offline
Posts: 307
Date:
Permalink  
 

The brace under the trans is only temporary to hold the trans while making the proper cross member. Nothing will be below the frame rails.

__________________


Niagara Falls Rod-Side Member

Status: Offline
Posts: 174
Date:
Permalink  
 

ahhh that explains it............thanks


__________________


http://lightspeedmetaldesign.com/

Status: Offline
Posts: 307
Date:
Permalink  
 

 One of the most critical parts of the build as far as I'm concerned brake , gas, steering column and seating position. If it ain't comfortable to drive or awkward to reach the pedals it takes the fun out of driving it.
First is the brake pedal, most cars it's about 7"-8" off the floor and 24" from rest the the steering wheel. The brake has to have sufficient travel for full stroke. Then the steering column is centered over the seat. Where the steering goes through the firewall has to clear the engine. Usually the pedal and column want to occupy the same area too. So with much head scratching, trial, error and a few mock ups. Drill some holes and locate the booster. Build under dash bar to mount column. Cut off brake pedal cause it hitting steering column. Throw away factory pedal booster mount bracket cause it ain't working. Draw up new one in CAD. Cut, tack, position, better. Cut and bend 2nd brake pedal to go around column. Ok. Cut hole in floor a little bigger to move column slightly, Be prepared to make another firewall repair. sigh. Steering shaft can't get between exhaust and shock mount. Cut off new shock mount. Throw away. Mock up steering. Will work now. Make new shock mounts. Cool, they look better than the first ones. Modify gas pedal so it will sit properly. Position as far to the right as possible, at rest slightly lower than the brake pedal. Make mount. Mock up seat, climb in. Not time for vroom, vroom noises yet. Check for comfort, steering wheel, centered, dash visable? check. Brake pedal, easy reach, could come over to the right about and inch. No problem do later. Gas pedal looks good. Make up lower column mount. 2 pieces, piece 1 round flange to be welded on column. Piece 2, mating flange to first flange, short length of tube and small hole in end for the shaft to pass through. Second piece will be welded to the floor later. Cut out all the previous patches in the firewall and make one big repair. Much better. Make up shifter bracket to be welded to the floor.

IMG_1876.JPGIMG_1874.JPGIMG_1875.JPG

IMG_1879.JPGIMG_1880.JPG

The ugly cut out.                                                                  Much better.

IMG_1873.JPGIMG_1872.JPG


Attachments
__________________


Cobourg On member

Status: Offline
Posts: 144
Date:
Permalink  
 

you seem to be missing the third pedal and have some kind of foreign looking transmission in place of the standard that should be there, care to explain?


__________________


http://lightspeedmetaldesign.com/

Status: Offline
Posts: 307
Date:
Permalink  
 

Parking brake isn't installed yet.
Transmission is domestic, straight from the 2004 Chev truck donor.


__________________


http://lightspeedmetaldesign.com/

Status: Offline
Posts: 307
Date:
Permalink  
 

I have been doing some work to the car. Welded in the floor. Got the seats in. Will have to adjust the brake pedal over a little.  Other then that feeling comfy.   Made up a mount for the ECU on the inside firewall.

IMG_2030.JPGIMG_2028.JPG


Attachments
__________________


http://lightspeedmetaldesign.com/

Status: Offline
Posts: 307
Date:
Permalink  
 

I had left off the front frame horns because I was sure where they needed to be to clear the fenders. Mocked up the front sheet metal to check clearances. Figured out where to end the ends of the frame, also had to figure how and where to put the front sway bar. Mocked up, measured, drew pieces out in CAD, cut out. Screwed up, threw out started again. Had to narrow the frame in 1" to be able to mount my sway bar. I just moved over the ends and will make filler pieces to make it more esthetic. Bolted on the sway bar and now have to make mounts on the lower control arms.
IMG_2038.JPGIMG_2037.JPGIMG_2039.JPG

I welded the nuts for the sway bar in before the welded the horns together.

I also welded some 1/2" nuts on the inside and outside of the frame horns. I figured I may run a bumper or a set of nerf bars or a chin bar so it was easy to do it now.

If I don't end up using them I can either put some bolts in or weld them up later.


-- Edited by Lightspeed Mike on Friday 16th of December 2016 08:44:27 AM

Attachments
__________________


Komoka On, Board recruiter, Good will embassador Rod-side Member

Status: Offline
Posts: 854
Date:
Permalink  
 

Looks good Mike.
Is the swaybar from strong arms?
TMJ


__________________

Just here in the "Back woods "  


http://lightspeedmetaldesign.com/

Status: Offline
Posts: 307
Date:
Permalink  
 

It's a chassis engineering sway bar. It fits, but is very tight on full lock. Can't say I'm completely impressed. Order all the front end stuff form Horton thinking I would get a kit that would fit together. Nope, almost everything I ordered was a different company. I got to make it fit.
The brackets for the sway bar are designed to bolt on to a factory MII control arms. Using CAD (cardboard aided design) I have designed my own. They are next to be welded on. I looked on the Ride tech (strong arms manufacturer) website and didn't see mounts available for these arms. Not impressed with their stuff for the price I paid for it.


__________________


http://lightspeedmetaldesign.com/

Status: Offline
Posts: 307
Date:
Permalink  


Made up a couple of mounts for the control arms. Checked clearances to the bags and found them a little tight for my liking. So I trimmed the corner 3/4" and welded it up.

IMG_2042.JPGIMG_2043.JPGIMG_2046.JPG


Attachments
__________________


Kemptville Ont Carpenter/Renovations

Status: Offline
Posts: 582
Date:
Permalink  
 

Looks great to me but for that matter anyone doing anything looks good to me. Nice when you have a shop to work in.

__________________

Building my dream one piece at a time.


http://lightspeedmetaldesign.com/

Status: Offline
Posts: 307
Date:
Permalink  
 

You can see in the last picture where I started to mount he alternator, I really liked low and out of the way. I had to mount as close the block as possible for clearance to the steering shaft. There are kits where can drill and tap the upper hole in the block but it was to close the steering shaft. So as with most of my stuff I designed my own brackets. 2 bolts from the waterpump and there is a hole on the side of the block to mount a bracket to. Measure, cut, weld, grind and make a spacer on the lathe, done.

IMG_2053.JPGIMG_2054.JPG

Battery box made up and brackets to bolt it to the frame.

IMG_2051.JPGIMG_2052.JPG


Attachments
__________________


Vetted member Newcastle On

Status: Offline
Posts: 120
Date:
Permalink  
 

Lots of nice work there Mike, looks great!

__________________

From deep in the heart of Newcastle.


http://lightspeedmetaldesign.com/

Status: Offline
Posts: 307
Date:
Permalink  
 

The truck oil pan is about 8.5" deep or about 3" to much. These is a couple of aftermarket pans out there that would work but the best fix is the 98-02 F body oil pan, baffle, pickup, dipstick and tube. It's about 5.5" deep and bolts up to the transmission like a factory one should. It's a stressed member and the manual has a specific way to tighten them up. A couple of places in the USA sells them as a kit to the tune of about $350 US plus shipping plus exchange plus duty. Found a used pan and parts on KIJIJI near Ottawa, so with a quick call to my brother he managed to pick it up for me and delivered it over Christmas. Woo hoo, saved me a bunch of cash. It's one of those parts I know I needed and I put off buying cause it doesn't really advance the build at this point.
 I had fix my parts washer to clean up the pan. I built it years ago with an old stainless sink, oil furnace pump and motor. Everything was gummed up from sitting, pulled it apart, cleaned it up, drilled out the passages for more flow, works mint.


__________________


http://lightspeedmetaldesign.com/

Status: Offline
Posts: 307
Date:
Permalink  
 

I wanted to get the fuel injection wiring sorted out instead of it lying there intimidating me. I got the wiring diagrams, connector pinouts, etc. Most people who run these engines usually discard any thing that doesn't make it run.
I wanted to keep all the systems except for the anti theft intact. It requires more fuses, wiring and thinking. The Ecu will be mounted under the dash instead of under the battery like the trucks do. I am trying to keep this modular too like newer cars, IE not have to cut the harness apart to extract it from the car. The OE fuse block was way to bulky and didn't need all the circuits, At the scrap yard I managed to pick up 3 fuse blocks from the sunfire/cavalier family.
They are fairly simple and can be repinned almost any way you like. This is what they look like when you get them.

IMG_2066.JPG


Removed all the fuses and relays, removed back cover, remove all the wiring and cleaned. Followed wires, labeled, made notes, drew diagrams, studied wiring diagrams.

Cut, soldered, and repinned till it looked like this.

IMG_2068.JPG

In place.

IMG_2067.JPG

I have 2 wires from the maxi fuses that will feed the inside fuse panel/ ignition switch and I think I will be having 3 wires coming back from the ignition switch to the fuse/relay panel.

Yes maxi fuses are way better than damn old fusable links that manufacturers used to use.


Attachments
__________________


member

Status: Offline
Posts: 67
Date:
Permalink  
 

Nice job, I worked on these systems for many years in the truck plant in Oshawa including the software programming of the modules. The last model year I worked on was 2008 when I retired and I know what that harness is like. Good luck and it looks like you are doing just fine with it.

__________________


http://lightspeedmetaldesign.com/

Status: Offline
Posts: 307
Date:
Permalink  
 

Got a chance to finish up my serpentine belt setup. Had  couple of ideas, finally settled on this setup.

IMG_2070.JPG


Attachments
__________________


Brantford On, Hooked on Nova's

Status: Offline
Posts: 246
Date:
Permalink  
 

This is a great build thread. Thanks for posting.

__________________


http://lightspeedmetaldesign.com/

Status: Offline
Posts: 307
Date:
Permalink  
 

I fitted up rad shell, made up mounts, installed radiator and found things getting real tight.

Ordered some slim fans, wait 2 weeks.

Ordered some air intake parts, wait 2 weeks.

Time to figure out rad hoses. First thing I need to do is turn the lower thermostat housing 90 degrees, I need it down instead of to the right.

Looked them up to try and find one, by the time it hits my door step I'm into $160+no

I have aluminum and a TIG welder, what have I got to lose?

IMG_2077.JPG

The problem, going the wrong direction.

First make jig plate, drill fixture to reference to.

IMG_2078.JPG

Drew lines to reference outlet location, and new lines 90 degrees where I want it pointing.

IMG_2079.JPG

IMG_2080.JPG

Cut up a couple of small pieces of 3/8" aluminum for tabs. Clamped it all down to the fixture ready for welding.

IMG_2081.JPG

Did the same for the other side.

IMG_2083.JPG

A bit of time on the sander and files to clean them up. Ready for new mounting holes.

IMG_2084.JPG

I won't say this is my finest aluminum welding job but it did seem to stick together. I found that 4043 filler rod worked better than 5356.

IMG_2091.JPG

One of the old ears was in the way so I trimmed it off and cleaned it up the best I could. Nobody will ever see this part buried down below anyway.

Ready for install.


Attachments
__________________


http://lightspeedmetaldesign.com/

Status: Offline
Posts: 307
Date:
Permalink  
 

From T-stat to rad. It's shorter than the last sentence.
After trying to find a couple of rad hoses that would go where I needed it to I gave up on rubber molded hoses and ordered up some bent aluminum tubing and silicone couplers.
I rotated the outlet 45 degrees to better clear the intake tubing. mock up , cut, weld, done.

IMG_2103.JPG

Got 2 10" cooling fans, made up mounting brackets and a shroud to mount the fans to. The shroud is stainless and the holes were all dimpled.

Just like everything else on this car, it's tight. I have about 1/2" between the fans and water pump pulley.

IMG_2104.JPGIMG_2105.JPG


Attachments
__________________


Komoka On, Board recruiter, Good will embassador Rod-side Member

Status: Offline
Posts: 854
Date:
Permalink  
 

Any concern about hot used air from the engine area being pulled in through those 30 holes by the fans?  
I understand why the holes are there but air will take the route of less restriction. At a stand still/idle would the air under the hood not just circulate through the fan and back through the holes and through the fans again? There is no restriction at the holes but there is going through through the rad. If so there would be no air movement through the rad atall. 
Just my opinion.
TMJ


__________________

Just here in the "Back woods "  


Cobourg On member

Status: Offline
Posts: 144
Date:
Permalink  
 

if the fans are pretty much right against the rad then it should work but if theres any space the fans will draw air in through those holes, the fans are really only needed if idling a long time.  as well I read that these fans are more efficient if pushing the air through instead of pulling.


__________________


http://lightspeedmetaldesign.com/

Status: Offline
Posts: 307
Date:
Permalink  
 

I always hated the original hood design on these cars. They were split in the middle and the each half of the hood and side panel were riveted together. I disliked it so much that years ago I separated the sides and hood, sold off the center strip and welded the hood together without a plan of how to make it work later. My only regret was I should have done a better job of welding the hood. I now have some wrinkles to work out.
I always liked the tilt forward design, so with cardboard and scissors in hand I made some strips and played with the pivot points till I got to where I figured it would work. Transferred the ideas to metal and assembled. A bit of tweaking and it seems to work. It's not finished yet, I still have some finessing and gusseting, latches etc to do but I am pleased with the result so far. The coolest part is that it's self balancing. The hood will stay about 3/4 way open all by it self, no prop rod, no binding of the hinges. I will make a prop rod to hold up when open though.

IMG_2110.JPGIMG_2111.JPGIMG_2112.JPGIMG_2113.JPG


Attachments
__________________


Courtice On Rod-Side Member Pin Striper

Status: Offline
Posts: 700
Date:
Permalink  
 

I like the hood!

__________________


http://lightspeedmetaldesign.com/

Status: Offline
Posts: 307
Date:
Permalink  
 

I'm making this car emission compliant, fortunately there isn't much on this engine but I do need a charcoal canister. Original bracket, toast. Made up a new bracket but it bolts to the frame from the back. I didn't want the bolt heads rubbing through the plastic can. I have wanted to try this for a while so I made a stamping die to recess the bolt area. Stuck it in the press and Voila recessed panel.

Yes I should have left more material on the top, but the holes were all ready in. Nobody will ever see this anyway.


IMG_2344.JPGIMG_2345.JPG


Attachments
__________________


Kapuskasing On Member

Status: Offline
Posts: 24
Date:
Permalink  
 

That great work it coming alone nice

__________________


Tin basher Metal shaping guy

Status: Offline
Posts: 414
Date:
Permalink  
 

Nice tool Mike. It worked well.

__________________

PUGSY


Vineland On Rod-Side Member

Status: Offline
Posts: 421
Date:
Permalink  
 

slab wrote:

This is a great build thread. Thanks for posting.


 X2


__________________


Wellesley, on Member

Status: Offline
Posts: 45
Date:
Permalink  
 

Very Cool. A fella can learn a lot by watching your progress.  Thanks for sharing brother...


__________________

If at first you don't succeed, lower your standards and GET A BIGGER HAMMER!!!


Portland On Rod-Side Member

Status: Offline
Posts: 166
Date:
Permalink  
 

HI MIKE : It is GREAT to see your progress and FABULOUS workmanship -- Keep us informed ! Hope to see the finished product soon -- LATER -- DON / FLEET 51

__________________


http://lightspeedmetaldesign.com/

Status: Offline
Posts: 307
Date:
Permalink  
 

Thanks for the positive comments guys.
Unfortunately I haven't had much time lately to work on it. I have done a few things, remount he ECU to a better spot, mount the power seat switches, refine the hood hinge etc.
Getting into a few head scratchers now. Hood latches, where to find a right rear fender and exterior body work (ugh).
Trying to decide tail lights, I'm thinking Chev HHR taillights may look good. Opinions here are welcome. Please don't tell me to use 59 Caddy, I like fresh and new ideas.
Will post updates when there is something fit to print.


__________________


http://lightspeedmetaldesign.com/

Status: Offline
Posts: 307
Date:
Permalink  
 

 The rear fenders need to be an inch wider for tires clearance. After search for 20 plus years for a RR fender I found this, I knew it wasn't great but better than anything I had so far. It had some previous rust repairs done and filled with lead. Fender must have weighted 30 pounds. I sanded all the primer off and got the torch out to melt it all out. I want to redo the patch in the back. It's got a bad twist in it too.
My plan is to build an extended flange on the body then cut off the original and weld the two together. I plan to weld the rear fenders on in the end because I like the molded look better and there's no way I'm ever going to make the fitment nice enough to bolt it together.
I got a fairly good start on building the flange over the last 2 days.

IMG_2490.JPGIMG_2491.JPGIMG_2492.JPGIMG_2494.JPGIMG_2496.JPGIMG_2497.JPGIMG_2498.JPG


Attachments
__________________


http://lightspeedmetaldesign.com/

Status: Offline
Posts: 307
Date:
Permalink  
 

A bit more progress, I finished the flange enough attach the fender to. Lined up the fender marked the cut line and trimmed it off. Cleaned up the edges and proceeded to make the two pieces one.

IMG_2500.JPGIMG_2501.JPGIMG_2502.JPGIMG_2503.JPGIMG_2504.JPG

I plan to rework the back edges of the fenders where they meet the tail panel. I want to trim the leading edge of the fender in order to tighten up the running board to the body.


Attachments
__________________


Kemptville Ont Carpenter/Renovations

Status: Offline
Posts: 582
Date:
Permalink  
 

Looking great. Might have to steal some of your ideas to widen my rear fenders.

__________________

Building my dream one piece at a time.


Wellesley, on Member

Status: Offline
Posts: 45
Date:
Permalink  
 

Looking GOOD!!!


__________________

If at first you don't succeed, lower your standards and GET A BIGGER HAMMER!!!


http://lightspeedmetaldesign.com/

Status: Offline
Posts: 307
Date:
Permalink  


Making a little progress lately, damn job keeps taking up my free time.

Working the front fenders to fit better so I can start on the running boards. I'm going to build them  with an instep and raise them an inch to tuck them in.

Clamped the original boards to the fenders and bent up some 1" tube for edge profile, laying it on top to get an idea of how it will look.

I clamped a piece of 1" X 1" square tube to level and square to draw the cut line on the fender.

IMG_2506.JPGIMG_2533.JPGIMG_2534.JPGIMG_2535.JPG

Making  a new section for the bottom of the rear fender. Need to fix it be fore I can start the running boards.

IMG_2536.JPG


Attachments
__________________


http://lightspeedmetaldesign.com/

Status: Offline
Posts: 307
Date:
Permalink  
 

 New right rear lower fender section welded in.

IMG_2537.JPG


Attachments
__________________


http://lightspeedmetaldesign.com/

Status: Offline
Posts: 307
Date:
Permalink  
 

I cut 1" off the bottom of the fender, laid it on a piece of 16 gauge tacked it on and trimmed the outside edge. I finished enough to make sure it was ok so I could start the running board.

IMG_2539.JPG


I then  lined up the tube and profiled it to the rear fender. Made up mounting brackets to go to the frame.

IMG_2540.JPGIMG_2541.JPGIMG_2542.JPGIMG_2543.JPG

Put the back wheel on and jacked up the suspension for a profile look.

IMG_2544.JPG


Attachments
__________________


Courtice On Rod-Side Member Pin Striper

Status: Offline
Posts: 700
Date:
Permalink  
 

nice Mike!

__________________


Kemptville Ont Carpenter/Renovations

Status: Offline
Posts: 582
Date:
Permalink  
 

Wow, looks great. Very great I he

__________________

Building my dream one piece at a time.


Race starter St.Thomas Drags Rod-side Aylmer On Member

Status: Offline
Posts: 1409
Date:
Permalink  
 

Nice work for sure!!


junior


__________________

Government is a broker in pillage, and every election is sort of an advance auction sale of stolen goods. HL Mencken. 1919.

"If you want a vision of the future, imagine a boot stamping on a human face - forever." George Orwell 1984


Niagara Falls Member

Status: Offline
Posts: 270
Date:
Permalink  
 

She,s coming along nicely. Looks good.

__________________


St.Thomas On Rod-side member

Status: Offline
Posts: 495
Date:
Permalink  
 

Sure meets my approval.

__________________

if you don't like the way I drive, stay off the sidewalk.


http://lightspeedmetaldesign.com/

Status: Offline
Posts: 307
Date:
Permalink  
 

Left side running board frame work done

ls.jpeg


Attachments
__________________


http://lightspeedmetaldesign.com/

Status: Offline
Posts: 307
Date:
Permalink  
 

Using all the knowledge I learned from Pugsy's one day learn to pound sheet metal course it was time to rebuild the RR fender. This ugly mess had to go. Modifications were required to blend where the fender meets the body as it was just kinda hanging in midair.

IMG_2572.JPG

Nobody makes patch panels for these fenders either. I ordered some curved sheet metal to fix it but it showed up flat, supplier told it ships better this way.wink

IMG_2566.JPG

I cut out an oversize piece and started pounding a running it through a borrowed English wheel.

I quickly realized that I had to do some shrinking to make it rounder. I don't have a wooden stump or a tucking fork so I built the Tuck-O-Matic 9000.

IMG_2576.JPGIMG_2577.JPG

Getting real close.

IMG_2575.JPG

No turning back now.

IMG_2579.JPG

I made a simple wire frame for the bottom of the fender and tacked it in.

IMG_2580.JPGIMG_2581.JPGIMG_2583.JPG

Getting it as close as I can for fit up, I butt weld all my sheet metal.

Tacked the piece in and cut out the hold on tabs from the backside.

IMG_2585.JPG

A bit more  welding, grinding and hammering and it's getting close.

IMG_2587.JPG

IMG_2589.JPG


Attachments
__________________
1 2 3 4  >  Last»  | Page of 4  sorted by
 
Quick Reply

Please log in to post quick replies.


Create your own FREE Forum
Report Abuse
Powered by ActiveBoard