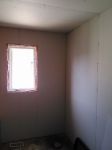
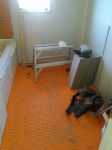
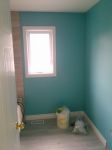
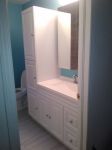
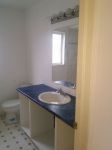
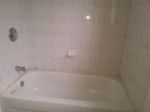
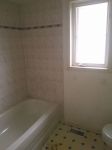
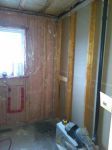
Hi guys and gals. I thought I would walk you through a typical bathroom renovation since the kitchen one seemed quite popular. This bathroom is a typical 20 year old plus unit. It has had a bit of abuse over the years as it was used primarily by one person but he is autistic. The parents have done there best to keep things patched up but at some point it is simply time to redo the entire space. Here are a few pictures of what we started with.
The homeowner took of the door fronts as he has some future plans for them. Looks like the toilet was replaced at some point as the stickers are still on the toilet.
The guys that uses this bathroom has at times been a bit rough, typical of some autistic people so the tiles along the tub are all cracked from being beaten.
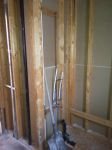
At the end of day 1 all the demo was done and cleaned up. Every thing came up nicely, not always the case. There was no mould behind the tub which is great. The only mould we found was around the toilet flange from what appears to be a previous leak. The piping was plastic but is an older type called poly B. This stuff is not great and has been known to leak if not used and installed correctly. I had to convert it to pex which is what is used today, hence the colour difference.
Insulation and vapour barrier are in great shape.
The original faucet is still in place here and will be changed tomorrow. Just extended and capped the lines for today.
This is a good time to think about the future as well. Esp. if you want to add grab bars, towel bars, heated towel bars or anything else that needs some reinforcing. In this case the owner wanted one grab bar and a towel bar so I put some wood into the wall for that.
A little trick for you, a bonus as such. As you get older grab bars will become a necessity. Hard sometimes to know where to put them so what I do in that case is surround the walls of the tub with 3/4" plywood. A 4'-0" band about 1'-0" above the tub is good. Take a picture and cover it up. That way when you need to add a bar or two the backing is there and you can screw anywhere. I did that earlier this year for my son when we redid his bathroom. Only 25 years old but has some health issues that may at some point my required some additional help.
Stay tuned as I will follow the same format as the kitchen and update every day or two. If you have any questions or feed back as always it is more then welcome.
Looken Good Marten: I always appreciate a worker who cleans up his work area prior to going home for the day.. Some have only lasted that long working for me.. leave a mess you will get an early morning call to pick up what I owe and I will get somebody else to finish the job.. I have little tolerence for sloppy work and leaving a mess..
Thanks for your posts on this stuff we all learn from other's skills..
Chuck
__________________
There is no elevator to success — you have to take the stairs.
Looken Good Marten: I always appreciate a worker who cleans up his work area prior to going home for the day.. Some have only lasted that long working for me.. leave a mess you will get an early morning call to pick up what I owe and I will get somebody else to finish the job.. I have little tolerence for sloppy work and leaving a mess..
Thanks for your posts on this stuff we all learn from other's skills..
Chuck
Thanks Chuck, I like coming to work with a clean site. Happens most of the time. Some times I get wrapped up in what I am doing so will rush out but have to do a clean up first thing. Seems to set the whole day back.
Have a completely gutted 2nd floor and a bathroom on the mainfloor. Not pretty. Guessing 125 year old rot etc. (Not my place, just a job I unwittingly took on)
The bathroom was 3 inches out in 8 feet on the east wall. Been slowly jacking it up for a month from the head-banger basement (if you're taller than 5' tall, which I am)
I remember now, why I stopped doing this. Knob and tube, Galv and cast Plumbing etc.
I'd almost rather use a grinder to trim my toenails !
On the lighter side, I won't let this place beat me. (semi side job anyway)
Great work you do Martin from what you're showed us.
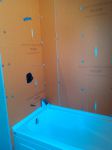
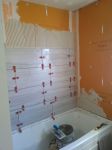
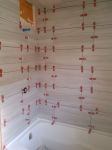
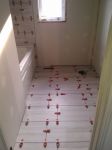
It is now end of day 2. This is when the most important stuff gets done. Tub is installed, taps installed and all backing that is required is installed. Oh don't forget to test the tub drain. In this case I had to go in through the back of the linen closet to connect the drain. I will get an access door to cover the hole. Drywall has been installed and Kerdi board is on around the tub.
This Kerdi board is amazing stuff. The orange you see is a water proof membrane. It is on both sides with a foam core in the middle. 1/2" thick so lines up with drywall. You can get it in various thickness up to 2". If you like you can build counter tops and tub surrounds with it. Unlike drywall it will not hold water so no chance of mould happening. For the joint there is a special material you install, kind of like taping drywall. You will see it in the next update. Once applied it makes the tub surround water proof and you could shower in it. The biggest difference is that you need to use thinset adhesive on it or the tile will fall off. Don't know why my phone makes things so blue but the tub is white.
-- Edited by Marten on Monday 11th of September 2017 07:44:09 PM
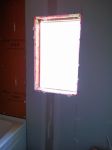
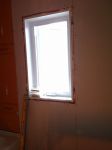
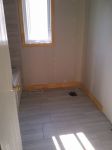
End of day 3. Did a few misc. things today. Had to change the window, old one was broken so good time to do it.
Out with the old.
In with the new, wow was that easy or what. Spray foam insulation. Watch that stuff. Different types and brands. Got to use the window and door stuff. And if you believe it some brands are known for shrinking down the road.
Also put on the first coat of joint compound, or mud in my world. Not much picture worthy with that though.
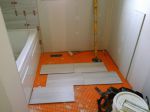
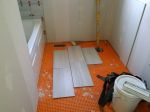
Also installed the Ditra mat membrane on the floor. In this case I used Ditra XL. That way if the homeowner wants hardwood down the road it will be flush with the ceramic tile.
And then some misc. things to get ready for tiling tomorrow including dragging the tile upstairs. So not a lot of exciting picture stuff but if you do each step along the way right and perfect it will make the next steps much easier. Things like setting the tub in perfectly flat, not following the floor will make tiling much easier to keep straight and plumb. Setting the window in plumb next to tile that is plumb makes things look much nicer as well. Little things, some people don't notice, some do and some notice after their friends say something. Do it perfect and no one will say a thing but get it wrong and man oh man do you hear about it.
End of day 4 has now come and gone. Started tile work today.
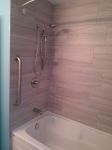
This picture shows the tile started but what I want to show you is in the corners and wherever there is a butt joint I install Kerdi band over it first. This makes things water tight. You could in theory have a shower in it after this is dry. Starting tile layout is the hardest thing to do and look good. After that it is very straight forward as you follow a pattern. The tile are 12 x 24 tile. You have to lay them at 1/3 or 1/4 offset from each other or square lay them. All larger tile have a natural crown in them. If you lay then like brick or 1/2 offset you have the highest part matched up with the lowest and that does not work. In this case I picked out 1/4 offset, just because I thought it would look good. Normally I get the homeowner involved with pattern picking if they have an interest. In this case they did not as long as it looked good and was well done. I always try to relate the tile pattern to something as well. And try to avoid having small pieces of tile in the corners or at the outside edges. I always start with the back wall and tie in the ends to suit. This picture also shows some thinset ready to accept the tile. Your bonus note, always leave the tile about 1/8" above the tub. That gives you some space to push the caulking into afterwards and avoids tub squeak.
At the end of the day it looked like this. Tried to get the tile that I cut on the back to go around the corner. Worked most of the time until I broke one tile and had to not do it for one row. Using thinset adhesive and doing it by myself make is slow but this way I know it is done right. Lots of walking up and down stairs for sure. Part of relating the tile to something, in this case was to center the taps between the vertical joints of the tile, hence the layout you see.
End of day 5. Oh forgot to say every day gets a coat of mud on the walls as well. Today was the third and final coat. No pictures of that, to boring. So today I finished off the tile work. For the floor was not sure what way to run the tile. Owner once again left it to my professional thoughts and hands. So I did a rough layout to see what would look nicerer.
One way
The other way.
And the choice was...........
Again always try and relate the tile to something as it allows things to flow better. In this case although hard to see I started with the center of the door. So the small overlap area you see is the center of the door. It also lines up close to the center of the window. This allows for almost a full tile at the tub and large pieces behind the toilet as well. Try and avoid completely full tiles anywhere as walls as rooms are never square. Also think about sight lines as you walk into a room as the lines you see first have to be straight and parrell to each other. As it turns out in this case the small piece of tile you see on top of the tub and the first piece on the floor work out to a full tile together, real luck there though. Every row of three tiles has two cut tiles, lots of up and down stairs for sure. Well hard work doesn't hurt anyone right? Wrong!!!!!
Thanks guys. Ya that Rainmondi leveling system is the best there is. I use it all the time. Almost impossible to get larger tiles level without it. Best part is knocking off the wedges the next day. They fly everywhere.
And now we are at the end of day 6. Drywall got sanded first thing. While the dust settles that is a good time to do some clean up, organize your tools, etc. In this case I still needed to caulk the window so did that. No pictures as that is not exciting. Once the dust settles you get to clean it up. I like to vacuum it as it gets all the dust out of the joints as well and the dust is now gone instead of back in the air. Grouting is next. I love the transformation from tile to grouted tile. It is a small but important step and it makes a world of difference. Tip of the day, you are the closet person to the tile so look carefully at each joint as you grout to make sure it is nice and even. As with all building products, follow the manufactures instructions as they have made all the mistakes already, you don't have to, way easier that way.
Also installed all trim. Got everything ready for painting.
Why is it you pros make it look easy when it really isn't. Nice work.
Come with a lot of experience and practice. Not that it is not easy or hard, you need to break it down to little steps. Watching others do it helps. So does doing it on your own house. I learned a lot of this by watching other people do it. Look at what tools they have, then finding a reason to buy the tools and try it myself.
Bonus trick/tip for you and anyone else reading this. If you understand the basic concepts of straight, square and level you have 90% of this stuff already licked. Things have to be that way and the rest becomes easy. Straight is perfect between to point, not close, square is 90 degrees, not 88 or 93 degrees and level is not within the two lines of the level, it is exactly equal on both sides of the bubble to the lines of the level. And referencing some major highway as in you can't see it from the 401 is pure crap. I know that, but I can see it up close, now fix it!!!!!!!!!!
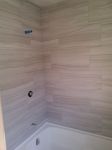
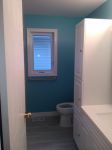
End of day 7 and the painting is now done. Not much to say here except that a good painter can make an average job look great just as fast as a average painter can make a great job look not so good. Colour here is called Pool Blue, the owner always gets to pick the colours. Ceiling and trim are white.
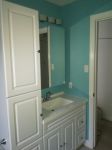
And now we come to the end of day 8. This is when it all comes together. All the parts and pieces go back in. Toilet, vanity, sink and taps, shower finishing, shower rod, a final cleaning and all the caulking.
And I walk out the door with a happy client. Sorry for the break up in days but I was there every day for 8 days. Just been to busy to update every day. I can consistently do bathrooms of this size in 8-10 days depending on what else I need to do, and I work alone. In this case the homeowner picks out the fixtures. I usually let them pick out their stuff but help them by guiding them on where to buy their stuff. I work with various wholesales company's so will always send them there first as they can get better products and pricing that way. Always trying get them to avoid the big box stores.
I really like the corner tile idea.
Is that shower doo dad glued on?
Poly B will go bad with hot water running through it.
I'm replacing mine a bit at a time.
I really like the corner tile idea. Is that shower doo dad glued on? Poly B will go bad with hot water running through it. I'm replacing mine a bit at a time.
Thanks about the corner tile. I think it turned out cool as well.
Doo dad? I am assuming you mean the fitting that attaches the shower hose to the wall. That is a special fitting that comes with the shower hose and bar. Is attached to a regular shower fitting, called a drop ear elbow. Uses a nipple to attach the two together. Does that make sense?


 reminds me of my bathroom reno, glad it's done.