I do a lot of kitchen renovations being self employed. I am doing one now that is in a condo. Will be using an Ikea kitchen. All kitchen renos follow the same pattern. So just wondering, would you folks be interested in following along as I do this? If it is a no more then yes that is fine, but if no answer then I don't know what you like or don't.
We just did a huge reno on our 1956 kitchen. It's almost done now but I'm open to suggestions and hints, and I will offer anything I learned from doing ours. Like many such projects, I wish I'd known as much about doing this stuff when I started as when I finished!
I'm always game for following builds no matter what they are.....unless it's electronics and we need to watch you solder a thousand connections together...or maybe watching the paint dry....or.................
Post away!
I really need to watch someone else suffer after building my house.
This is a smaller kitchen in a condo on the third floor of a building. There has been very little work done over the years to it. My client just bought it. She describes herself as a lady with a champagne style and a beer budget. Recently divorced and for the first time trying to do things on her own. As a cost saving she went with an Ikea kitchen and did the design herself.
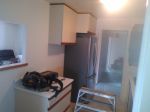
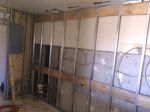
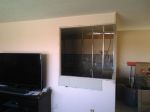
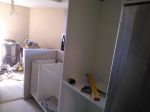
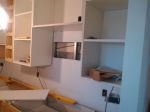
In this picture you can see the wall oven sitting on the ground. Just sitting there to stay out the way until I could start. Normally the stove sits there. Guess she has been living with a hot plate and crock pot. Above the cabinets is an electrical panel. The electrician was in earlier and turned the panel around. It was facing the kitchen side originally. It was not large enough to accommodate the new appliances as well. Normally I would coordinate the electrical so it is all done at once but she has a favourite electrician and he was available one day so he did this a head of the reno. The door frame is a steel door frame, actually hard to see but there is one at the other end as well. The originally held doors so you could close off the kitchen, common in the 80's when this was built.
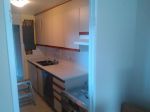
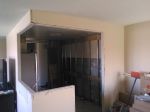
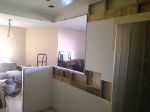
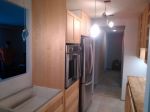
Other side of the kitchen. The single lower was moved to allow the new fridge to sit in its place, that is why the wall colour difference. This is a galley style of kitchen and not well laid out. Part of the goal is to open it up a bit as well.
Not sure why this opening was here. There were no cabinets on the other side so seems like a waste of space but wanted to show you for future reference as it will be going away. The steel door frames will also be leaving. The goal is to make this a more open feel kitchen and also function better.
Boxes in the corner are the new cabinets, all from Ikea
YES --That's our next adventure at home- Kitchen Reno.
Please post, need all the ideas available.
Junior
Junior happy to help you where I can. More then willing to give you any guidance I can from this side of the keyboard. Ideas, I have lots seeing this is a large part of what I do for a living.
Beaumont67SD, That space looks great. Excellent use of wood and colouring.
It is so great to be able to do some or all of this yourself. There is a cost saving for sure but the feeling of saying "I did it myself" is amazing. Works especially well when it is outside of what you normally do. Being a carpenter it is almost expected to do the work on your own house yourself except it is normally the most ungratifying, unrewarding work there is. I have always hated working on my own place unless I was unemployed or under employed and could do the work during the day, during the week. There has been times where I have taken time off to do work on my own places. That usually works a lot better.
Day one was a demo day. For this we removed all cabinets. We were able to salvage them and put them up for free on Kijiji. Someone wanted them within a couple of hours of it being posted. They came and got them the next day once I had an elevator. Backsplash was ceramic tile so cut out drywall to get rid of that. All cleaned up ready for the rebuild. That was straight forward so no pictures of any demo. Picture stuff on the ground and garbage everywhere.
The next day we started rebuilding.
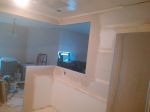
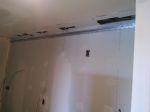
This one wall was a surprise as it was drywall glued direct to concrete. The electrician needed a space to run his wiring and boxes so the solution was to build a wall in front of the whole thing. Used 1 5/8" steel studs for that. You can see plywood strips as well. That is backing for the new cabinets to be screwed to.
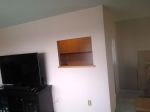
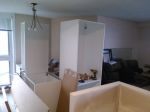
Remember the original pictures. There was a steel door frame here and a small pass through. All gone now and made the opening to look like this. The client wanted a more open feeling kitchen. Left a small bulkhead at the top to not to affect the ceiling.
The right hand side of this picture is the corner of the fridge. On this wall we needed to cut out some drywall to put in the backing same as the other side. The electrician also needed the wall open for his stuff.
That takes us to the end of day 2. Electrician will be in the next day to finish off what he started.
Beaumont 67SD and others
The reason for the galley kitchen is that this is what was there originally. If we were to make it bigger or change it in any way it would affect the living room sizing. The wiring comes through the concrete slab into the existing walls as well. Chipping out a structural slab is normally not a good idea. So the goal was to work within the existing confines of the space.
While following Martens thread here I finally remembered when we did the kitchen at our house. It came to light in the removal thread. I had the RE Store come in and remove my old kitchen. They came in and in 3 hours had everything removed and loaded in their truck . They took everything including the old dishwasher which was about 30 years old.
They take it to their store for resale and when they sell it they give you a Tax receipt so you get to claim it on your income taxes. They did a very good and fast job and took everything back to their shop where they sold what they could and recycled or scrapped the rest.
Martin,
Looking great. At least the metal studs are in great shape.
I am a DIY'er and hate doing work in condos/apartments. One instance was a bathroom reno where the metal framing was just all rusted and crumbling apart. My friends wanted a soaker tub and the only way in was through the wall, then patch that up.
Later that year they asked if I could re-do their kitchen, told them I haven't the time. 4 years later and they still haven't put that kitchen in.
Beaumont 67SD and others The reason for the galley kitchen is that this is what was there originally. If we were to make it bigger or change it in any way it would affect the living room sizing. The wiring comes through the concrete slab into the existing walls as well. Chipping out a structural slab is normally not a good idea. So the goal was to work within the existing confines of the space.
Totally agree Marten & you do excellent work, it's clearly obvious / both in the carpentry & auto body trades.
I wasn't suggestion there is something wrong with a galley kitchen, its what you have to work with / in a pre-existing build, in customers place.
The point I was trying to make - in 35 years of home ownership / we only had 2 different properties.
a) the first house, which was small and not open concept / I designed and had built a 14x21 ft. sun room / it was the main focal point, in the house
b) the second house, had a pre-existing sun room 10x30 ft. / while similar square footage, it doesn't feel like the dream sun room, the first house had
So the Length & Width Ratios are totally different / first one was designed with a width x 1.5Factor, for length...galley 2nd was built with a factor of 3.0.
Renovating the 2nd house, the living room/kitchen wall was demolished and moved back 2 ft...after the floors, were in / an added challenge & expense.
- it worked because the kitchen was too wide, but not wide enough for an island addition
- so both the kitchen & living room Ratio, was improved, by 1 major wall change
- otherwise the former long & narrow living room, would be hard to furnish & the TV would be plunked, against the wrong wall
- but until idea was recommended, building the TV mantel wall was not originally planned for / so sometimes, an added cost makes sense
And playing with "Room or Wall Ratios - Length & Width", can change the enjoyment of the living space.
- if involved customers, are more aware / what I was leading up to, that's all...share a Design Concept, others here may find useful
-- Edited by Beaumont67SD on Tuesday 2nd of May 2017 03:06:44 PM
Day 3 was for the electrician. Not much to see here. He worked with the drawings that the owner provided to ensure that all the right boxes, outlets, switches, etc. are in the right place.
Day 4 was much more fun. Got back to find out that the electrician took more drywall down and removed some of my backing to get his wiring in. We had talked about what he was doing before I left and everything was good then. One of those things I guess. Could do something bad to him but after being in this world for a long time you come to expect it.
Did the drywall work and put first coat of mud/ drywall compound on.
Now you begin to see things take shape. At this point in time the homeowner starts to get excited.
These are the views from inside the kitchen. Wires that are hanging out of the wall are for under cabinet lights. The holes in the ceiling will stay there. Covered over by cabinets.
That is it for today. Hope you are enjoying the ride.
Day 5 Continued taping drywall. Second coat on. Not much to see there. Also started building cabinets. One of the joys of Ikea is the endless supply of cardboard you will have when you are done. Out here if I take it to the dump they double the tipping fees for the whole load of garbage, even if only one piece. If I take it home and put it out with my regular garbage they are not suppose to take it because it is for commercial use. So it leaves me with a dilemma all the time. Normally I try and leave it with the homeowner to put out with there regular cardboard. The garbage people seem to take it then. There are cardboard recycling places here but they charge you for that. In this case the homeowner has been kind enough to take it to the building cardboard drop off place.
Taped third coat. Shows the end in site for that work. If you do the taping right it makes all the difference in the world.
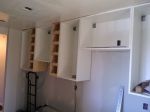
Also continued building cabinets. Got a couple of them installed today as well. With a small space I could only build so many before it was taking up to much real estate. The one really cool thing about Ikea cabinets is the mounting rail system they have. Make sure this rail is perfect and the cabinets hang on it. I needed the uppers to be as close to the ceiling without touching as possible. In this picture I flipped the rail upside down. The reason for that was that I did not get the backing up high enough when trying to screw it the right way.
Next step was to hang some cabinets.
Single lady, she thinks there is enough wine racks
When the homeowner got home she was super excited to see this happening.
Sanded drywall this morning. Man that job sucks. If you want to get good at taping you have to do your own sanding. You learn in a hurry then how much mud to put on the walls.
After that I continued to build and install cabinets. Got all the boxes built and installed. Then on to the drawer building and installing. All the lowers except the sink cabinet will be drawers. This makes for a much better use of space. You will also not have to get down on your knees to see what is at the back of the cabinet each time. Not sure what else to say here. This part of the job is build, install, repeat. No decisions to be made here as the design was finished earlier. Of note for some, you will see a long level in the pictures. I am old school per say in that I prefer them to lasers. Some will say that lasers are just as good and not a lot of debate here, I am just so used to working with a level that is all I use. In the first picture, lower left side you will find a themos. Very important part of what I bring to work every day. Gots to have the morning coffee break.
Was greeted with the smell of paint. The homeowner did the priming last night.
Continued building drawers. Also got a phone call first thing that the electrician could come today and install the plugs. With the heavy rains his work for today is cancelled. Worked out good for me.
One thing to remember is to always look at everything that has to be installed. I assumed that the microwave that goes over the stove was like others in that you need backing at the top of the unit. Well it turns out that I needed backing at the bottom so cutting more drywall and installing backing. See even after over 30 years of experience I can still make mistakes.
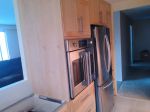
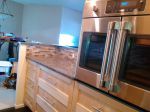
By the end of the day the doors and drawers were installed but not adjusted. Still need to put the handles on as well. Got the wall oven installed, but need to do some finishing around it. Left her with a piece of plywood that can be used for a counter top until a quartz one comes. At least she will be able to use the microwave and oven. She can also start loading up the cupboards. Will be cutting the fillers and small bits this weekend in my shop.
Not sure why the pictures show blue walls, they are not, just an off white.
good work marten. these condo kitchens are all pretty much laid out the same aren't they. just curious, minus the appliances, approx what kind of dollars will they have into this? i just sold a unit and i wasn't about to go over it for an update. now they have the bathrooms and the floors to consider after the kitchen is done to complete the do over. looks good marten and if you pulled that 6ft level out working for me i would be glad to see it. old school rules and the taper/mudder do make the job. lol
__________________
"if you are not the lead dog, the view is all the same"
good work marten. these condo kitchens are all pretty much laid out the same aren't they. just curious, minus the appliances, approx what kind of dollars will they have into this? i just sold a unit and i wasn't about to go over it for an update. now they have the bathrooms and the floors to consider after the kitchen is done to complete the do over. looks good marten and if you pulled that 6ft level out working for me i would be glad to see it. old school rules and the taper/mudder do make the job. lol
Thanks shag766
So my contract will end at approx. $5200. That is for the drywall work, including material, demo, floor installation, building and installing cabinets and ceramic backsplash, etc. Electrician was hired by the homeowner so guessing at $1500 but they had to change the panel and move it to the other side of the wall. Cabinets were about $5000 I think but again just a guess as the homeowner bought them as well. And the flooring will be cork, I think, clic lok type anyway so not real sure what that cost was. Oh and the homeowner is doing the painting themselves. And she is coordinating the supply and install of quartz countertops as well. So I guess I have no idea what the final cost will be. But it will be well worth it as the original was original to the unit.
And we can't forget about all the taxes.
I don't mind doing the taping. Would not do it for a living but for a few days I don't mind it. Put a cheap radio on to keep the voices in my head at bay and good to go.
More updates on Monday if all goes to plan, although my wife may have other ideas.
I know you asked Marten. But I have to say a year ago I priced a bathroom job with the customer supplying the vanity. If I had known it was a Ikea vanity I would have priced it higher. What a pain it was .
The floating vanity this guy had came with the Basin, PO (drain piece), taps everything. Imagine having one of these taps or mechanical drain and it breaks the day before the entire family comes for Christmas and the parts to repair it are in the old country. Most parts for the mechanics of it are not interchangeable with domestic parts.
Just my opinion
The best place in our area for cabinets just closed up. John Rowe in Sparta retried
TMJ
-- Edited by toomuchjunk on Wednesday 10th of May 2017 11:47:53 AM
Junior, I install one or two kitchens per year using Ikea. I really like them. They do have there limitations though. The boxes or the part you store stuff in only come in white or possibly dark brown so in this kitchen being a birch kitchen you can see through the edges of the doors the white. We talked to Ikea about this once and what they suggested is to get a pint of light brown paint and paint the edges. If you were getting a custom kitchen this would not happen. The sizing is also restricted so sometimes you have larger filler panels at the edges then normal or I have had to put them between cabinets as well depending on the layout. The cabinets are very strong once together. If you have never built one the first one can be tricky but after that they go together quite nicely. You need a # 2 and #3 philips screw driver and a hammer. They use picto type instructions but once you figure is out it is OK. As for TMJ's comment about the vanity, yes that part is a bit different but I have installed them as well. Could something go wrong at a bad time, yes but the odds are slim at best. From my experience this is a minor thing really. Never in all the years I have been in business have I gotten a call back. The drawers are metal sides and back with melamine for the bottom and wood or thermo foil for the fronts. The fronts of the drawers form the box of the drawer if that makes sense. They also use the latest in hinges and drawer sliders which is great. Great quality. Different brands of that on the market as well with some of them being total garbage. The up side is the cost and they are more cost effective then a custom kitchen if you are ok with the limitations. You will see some of that in my update.
Needed to make some fillers up so I did that in my shop using material from Ikea. The valances that Ikea have are about 2 1/2" high but the lighting is only about half as tall so cut that down as well. Hardest part of that was uncovering my tablesaw to do the work. Currently it is a work surface covered in plywood to protect in from welding sparks. No pictures as there was not much to see there. Besides is was Saturday when I did it
Day 9
I installed all the fillers first. Also installed a valance to hide the under cabinet lighting. I installed the handles and adjusted all the doors. You need to have everything together to do this as you need to look at things as a whole for misalignments. It is amazing how these little items eat up so much time. But makes all the difference in the world.
With all the cabinets done the only thing left was to install a floor. The home owner choose a dark brown cork floor. This is a clic lok system and that is why it would go down after cabinets. Normally if using ceramic you install the floor first. This was hard because the fridge was in the kitchen and was as heavy as a car so I could not move it out. Had to slide the fridge out, install some flooring, install the kickplate of the cabinet, move the fridge in then do the rest of the floor. Following so far? With a floating floor system you need to keep is away from everything to allow for expansion, but keep it in one place for the install. That was tricky as well. Final thing was to install some baseboard. In this case more of a patching of the base as the plan is to change all the flooring in the unit down the road. Moved the dishwasher into place and then the mighty big clean up.
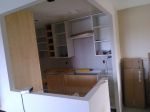
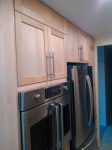
Wanted to show you this picture. One of the challenges of this job was the ceiling height was less then the standard 8'-0". The lady wanted cabinets to go to the ceiling. So on the microwave side there is less then the normaly 18" of space between the upper cabinets and lower units. On the oven/fridge side we used a standard 80" cabinet (your only choices are 80" or 90") but that left a large gap between the ceiling and top of the cabinet. The solution was to cut a door front and install it above the cabinet. Had to cut about 3" off the front so now it has no rail on the top at the ceiling. The other solution would have been a flat panel there but that would have looked weird I think.
And now we wait for approx. two weeks till the counter tops are installed. Then back to install a ceramic tile backsplash. Connect a sink and the dishwasher. But for now the homeowner can load up the cabinets and make some food as well. She is super happy with the results.
Hoping you have enjoyed watching this build. Sorry for the delay in the last two postings as I was out late the last two nights. Oh and some of the visitors to this postings have been the owner and some of her friends and fellow employees. Hi guys
So after a small break I am back. The countertops were installed buy someone else. They turned out great, nice colouring for sure. So now onto finishing up my work.
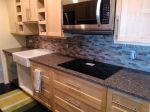
Day 11, I guess. Installed the sink, well glued it in place. This is done with silicone caulking. Most solid surface people will install the sink if it is undermount, i.e. the sink is mounted under the counter top but if it rests on top they will not do that. The sink is huge, in this case I believe they are called an apron sink. Cook top is just sitting there right now, electrician will wire that up soon. Then onto the ceramic tile back splash. Took the door off the sink cabinet to make it easier to access the plumbing.
This picture is a close up of the tile. Just remember this picture as it will be a reference in the next post.
The little white things are spacers that I use as required. The tile are on mesh sheets about 12" x 12" but when using thinset adhesive they tend to slide down sometimes. In this case had to use thinset as it was a glass tile and regular mastic type glue will not work. All done ready to grout the next day.
Day 12 OK so you get a bonus post today. Sens game was on last night so had to watch that.
All the little things got done today. Connected the water lines and drain for the sink and dishwasher. Both get tested afterwards to ensure no leaks. Never a good idea to leave water on pipes that you soldered at 4:00 pm. They have a habit of leaking at really bad times when you do that. Guess how I know that. So that work gets done first thing in the day. Electrician was in and connected the cook top. In this job it was one of those induction cooktops. Very cool product as you have to have a pot on the element in order for it to come on. From what I understand they are faster at boiling water then conventional units as well. Then onto grouting the tile. In this case because it was a glass tile I used an unsanded grout. In anything you do and for sure with tile work always follow the manufactures instructions. They have tested all their products and have found lots of ways for them to fail, you don't have to find new ways to fail. Cleaned up the job, and caulked the joints everywhere.
Don't know why the walls are blue again. They are not in real life. Must be the way my phone takes pictures.
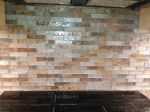
This is a close up of the tile grouted. I always enjoy the reaction I get from people when they first see tile work done as it makes a large difference. But for me grouting takes a tile from cool to amazing.
Funny story about the grout here. I gave the lady my sample board with about 30 choices in it and asked her to pick one. She said she was easy and I could pick whatever I thought would work best. Being a guy that is the last thing I would ever consider doing. In my world it could be orange, really don't care. Anyway, together we choose a couple of colours that were close in the tan/browns. Decided to take the tile and go to my supplier to get there opinion. The contractor desk was manned with a guy and together we came up with the same colour choices. They we grabbed one of the ladies from the show room floor and asked her. In about 2 seconds she looked at us and asked why the browns, there is more grey then brown in the tile, she pulls out a gray sample and says here use this. It worked perfectly. Is there a moral to this story, ya probably.
OK so I guess in the pictures it does not show as well as in person, sorry I tried.
So the big clean up and I am now done. Everyone is happy.
I hope you have enjoyed the show here. It has been a good job with a great client.
Enjoyed following along. What's next on your agenda?
So lots of work on the agenda. Some of my work is not worth doing blogs like this, either I am doing part of the work or the results are not really picture worthy. However I'm thinking that this has been well followed so as long as Chuck and others are willing sometime towards the end of next month I am doing a bathroom reno. Complete removal to the studs and new everything. Current bathroom is about 25 years old. Thinking that might be fun for a follow along.
Enjoyed following that - thanks for taking the time and for the detailed descriptions too!!! I have ikea cabinets in the house we just moved into, and we dig em. I second the use of drawers, as many as possible and deep ones when possible - they are so great. I wouldn't suggest anyone use the long silver handles this lady chose though. They haven't been in style for a few years now and don't really go with birch cabinets in the first place (my lady is essentially an interior designer who just got her first big contract and we have remodelling magazines all around our house, but not as many as my car mags, thankfully....)
Any more builds you do Marten would be great to see. I originally thought "home **** on a car site? no way"...but you do such a good job and it helps us all, so why not eh


 Shows the end in site for that work. If you do the taping right it makes all the difference in the world.


 So that work gets done first thing in the day. Electrician was in and connected the cook top. In this job it was one of those induction cooktops. Very cool product as you have to have a pot on the element in order for it to come on. From what I understand they are faster at boiling water then conventional units as well. Then onto grouting the tile. In this case because it was a glass tile I used an unsanded grout. In anything you do and for sure with tile work always follow the manufactures instructions. They have tested all their products and have found lots of ways for them to fail, you don't have to find new ways to fail. Cleaned up the job, and caulked the joints everywhere.