Members Login
Username 
 
Password 
    Remember Me  
Post Info TOPIC: box building


Kemptville Ont Carpenter/Renovations

Status: Offline
Posts: 582
Date:
RE: box building
Permalink  


Well I was suppose to be on holidays this week and the end of last week.  That has not worked out 100% however I am off but staying home for a few days.  So I get shop time biggrinbiggrin.  Lots of shop time.smile  
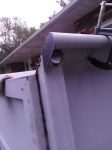
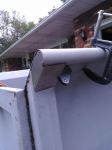
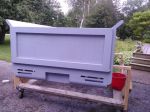
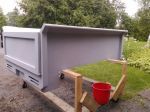
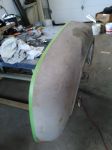
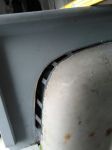
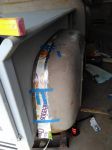
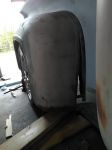
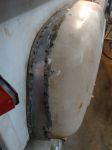
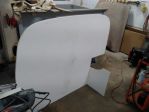
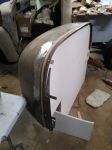
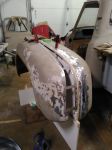
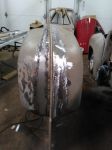
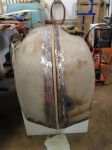
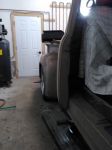
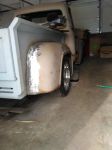
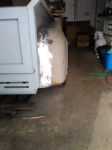
So more updates now.

With the hinge set up the way I wanted it was time to install the rear stake pockets.  Forgot to take a progress pic for that but here is the end result.  The goal was to have it as hidden as possible so all you see is the little tab sticking out.

IMG_20170710_185439.jpg

There was always a plan to cover over the holes in the bed end rolls.  The agreed upon profile looks like this.  There was a vote as I made up 3 different profiles but this one was the most popular of those I asked.  Sorry if I missed you as it was an in person vote only.

IMG_20170707_151342.jpg

And then I had a moment.confuse  What do you call it when an idea turns your world upside down.  OK maybe not that dramatic but something like that.  Found a piece of steel and formed this.
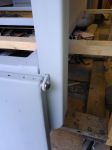
IMG_20170707_151409.jpg

A new vote was held.  Well actually it was just my wife this time and a new plan was enacted.  More welding, more grinding.  Then a bath over the bare steel with some metal conditioner, some sanding where there was primer and an epoxy primer job.  Primer dries, tailgate goes on and it looks like this.

IMG_20170710_162829.jpg


IMG_20170710_162845.jpg


IMG_20170710_162815.jpg

The weather over the last couple of days has been very conducive to working outside.  Very rare where I live but will take it.  Tomorrow it goes back on the frame to make sure it stays square while I install the hasp system.  Then ready for some metal glaze/polyester filler on a few low spots and we are done.  Fenders will come later.  I need to get the front sheet metal on to help line up the running boards.  They tie into the rear fenders so will do that all at the same time.  I am going to be getting the 3" wider fibreglass units as I want some bigger shoes under it.  Of course that gets me thinking again.confuse


Attachments
__________________

Building my dream one piece at a time.


London On Member

Status: Offline
Posts: 32
Date:
Permalink  
 

good job sometimes it is fun to challenge your self .from what I see you could do anything you want

__________________


Kemptville Ont Carpenter/Renovations

Status: Offline
Posts: 582
Date:
Permalink  
 

gribbs wrote:

Wish I had the the talent you have for this! Can I make a suggestion? The tail light slots are pretty 1990's street rod - Maybe french in some stylish taillights ('59 Olds ones, for example). That's more the style of the day. Either way, this will be awesome when you finish and you can point and tell people you built the box from scratch and that's rad.


 Thought about doing something like that but really like the slotted look. What I would like to do is get a set of sequential lights like the Mustang or the newer Audi have.


__________________

Building my dream one piece at a time.


Kemptville Ont Carpenter/Renovations

Status: Offline
Posts: 582
Date:
Permalink  
 

So I am back on the rear of my truck now that I have wheels and tires I am happy with.  Need to rework the fenders to suit the wheels.  I have been hesitating as I think this is very scary to do.  I know what I want to see in the end but not sure how to get there.  I had a visitor a bit ago so he helped me.  The first thing was to establish where the fender has to sit.

IMG_20190511_144533.jpg

Then draw a line around the outside.  While at it I made a cardboard cut out of the pattern for the other side.

IMG_20190511_144637.jpg

Marked a line on the fender 1" away from the edge so I would have a ridged spot to start from.  Took a deep breath and cut away.

IMG_20190511_150121.jpg

screwed the mounting flange back on the truck using the line I made earlier

IMG_20190511_192125.jpg

Then worked at putting the fender into position on where I wanted it to be.  Used some metal "fingers" to hold it in place.  Ended up having to rework the mounting flange to suit the profile of the fender as it changes the "flow" of the fender when you bring it out on a taper the way I would like it to be.

IMG_20190519_144335.jpg

IMG_20190519_144303.jpg

After much shrinking a stretching I was happy with the final look.  Then to fill in the gap.  Thought I should have some cereal first and then decided that cardboard was easier to use then metal.

IMG_20190519_172443.jpg

This is all new to me so any advise is always welcome.  Between work and what LOML wants done on the farm I don't get a lot of time to work on the truck right now.  And to throw in car show season, well......


Attachments
__________________

Building my dream one piece at a time.


Kemptville Ont Carpenter/Renovations

Status: Offline
Posts: 582
Date:
Permalink  
 

Well the hammer came down.  I now get at least one night a week in the shop.  

I cut out a piece of metal to match the template.  Cutting, grinding to make it fit.  Now tacking, hammer and dolly, tacking, more hammer and dolly, some grinding, repeat.

Am I doing this right?

IMG_20190821_205747.jpg 


Attachments
__________________

Building my dream one piece at a time.


Tin basher Metal shaping guy

Status: Offline
Posts: 414
Date:
Permalink  
 

Marten wrote:

Well the hammer came down.  I now get at least one night a week in the shop.  

I cut out a piece of metal to match the template.  Cutting, grinding to make it fit.  Now tacking, hammer and dolly, tacking, more hammer and dolly, some grinding, repeat.

Am I doing this right?

IMG_20190821_205747.jpg 


Yes, you're doing it right if your results are OK.

The shape looks to be blending in nicely.


__________________

PUGSY


Niagara Falls Member

Status: Offline
Posts: 270
Date:
Permalink  
 

MARTEN!!!!!!! You da Man> Nice work.


__________________


Kemptville Ont Carpenter/Renovations

Status: Offline
Posts: 582
Date:
Permalink  
 

Got the fender to where I am happy with it.  Ready for primer and bondo work.  It was now time to make the second side match the first one.  Took a piece of particle plywood that I had and traced the fender onto it.  Cut it to make a stand.

IMG_20191016_193659.jpg


Then cut a flange just like the first side and mounted it to the stand along with the first fender.  That took a bit of work with the shrinker and stretcher but got it close.

IMG_20191023_194452.jpg


Using the fingers I cut eailer I mounted the second fender to the stand.  Ready for filler panels and more welding.biggrin

Looks like this side had a bit of a accident as there was some bondo on it.  I will sand some of that out before priming and new bondo.

IMG_20191030_184357.jpg


Attachments
__________________

Building my dream one piece at a time.


Tin basher Metal shaping guy

Status: Offline
Posts: 414
Date:
Permalink  
 

Looks like you're having fun.
Good idea with the stand/jig.


__________________

PUGSY


Courtice On Rod-Side Member Pin Striper

Status: Offline
Posts: 700
Date:
Permalink  
 

congrats man! nice work

__________________


Kemptville Ont Carpenter/Renovations

Status: Offline
Posts: 582
Date:
Permalink  
 

Thanks guys. Ya,this is getting to be more fun. As I gain some confidence it gets better and a bit easier.

__________________

Building my dream one piece at a time.


Kemptville Ont Carpenter/Renovations

Status: Offline
Posts: 582
Date:
Permalink  
 

Side two almost done now.  A bit more welding, more grinding and will be ready for primer and filler.

IMG_20191204_193056.jpg

This is the rear of the fender.  Left side is the second fender I worked on.

IMG_20191204_193112.jpg

This is the front of the fender.  Right side is the second fender


Attachments
__________________

Building my dream one piece at a time.


Tin basher Metal shaping guy

Status: Offline
Posts: 414
Date:
Permalink  
 

Right on. Good job of it.

__________________

PUGSY


Courtice On Rod-Side Member Pin Striper

Status: Offline
Posts: 700
Date:
Permalink  
 

nice!

__________________


Kemptville Ont Carpenter/Renovations

Status: Offline
Posts: 582
Date:
Permalink  
 

Got them mounted.  Really happy with the way they turned out.  The truck is parked inside so can't get a pic of the whole back side but hoping this will keep you amused until spring or the next time it is warmer outside.

IMG_20191221_105349.jpg

IMG_20191221_105441.jpg

IMG_20191221_105434.jpg

This one is a little close for pics but there is a wall in the way.  This is the better side for sure.  The other fender is good but has some ripples in it.  I will try and get some of that out after I get the primer off.

IMG_20191221_105607.jpg


Attachments
__________________

Building my dream one piece at a time.


Tin basher Metal shaping guy

Status: Offline
Posts: 414
Date:
Permalink  
 

Looks friggen awesome.

Can you post a before and after?


__________________

PUGSY


Kemptville Ont Carpenter/Renovations

Status: Offline
Posts: 582
Date:
Permalink  
 

As requested here are a couple of shots with the tire on and the fender in the original spot.  The side view did not change as the fender stayed in the same spot that way.  Can't find any before's of the front view

IMG_20181216_093055.jpg

IMG_20181216_150114.jpg


Attachments
__________________

Building my dream one piece at a time.


http://lightspeedmetaldesign.com/

Status: Offline
Posts: 307
Date:
Permalink  
 

Nice job Marten, one of those touches that make a nice truck stand out.


__________________


Tin basher Metal shaping guy

Status: Offline
Posts: 414
Date:
Permalink  
 

Marten wrote:

As requested here are a couple of shots with the tire on and the fender in the original spot.  The side view did not change as the fender stayed in the same spot that way.  Can't find any before's of the front view

IMG_20181216_093055.jpg

IMG_20181216_150114.jpg


That's a HUGE difference.

You did good.


__________________

PUGSY


Kemptville Ont Carpenter/Renovations

Status: Offline
Posts: 582
Date:
Permalink  
 

Thanks guys for being so positive. This is a huge learning adventure for me. Thanks for all the advice. more changes coming. Give me a welder now everything is a piece of steel lol.

__________________

Building my dream one piece at a time.

«First  <  1 2 | Page of 2  sorted by
 
Quick Reply

Please log in to post quick replies.


Create your own FREE Forum
Report Abuse
Powered by ActiveBoard